Chemiluminescence Imaging System
SCG-W3000 Pro/SCG-W5000 Pro
여러 번 촬영할 필요 없이, 단 한번의 촬영으로 약한 신호부터 강한 신호까지 모두 관찰이 가능한 real-time / time-lapse Chemi. Imaging System
2025년 새롭게 Pro로 업데이트되었습니다.
W5000 Pro는 UV mode가 장착된 모델이며,
W3000 Pro는 Chemidoc. 전용 모델입니다.


Descriptions
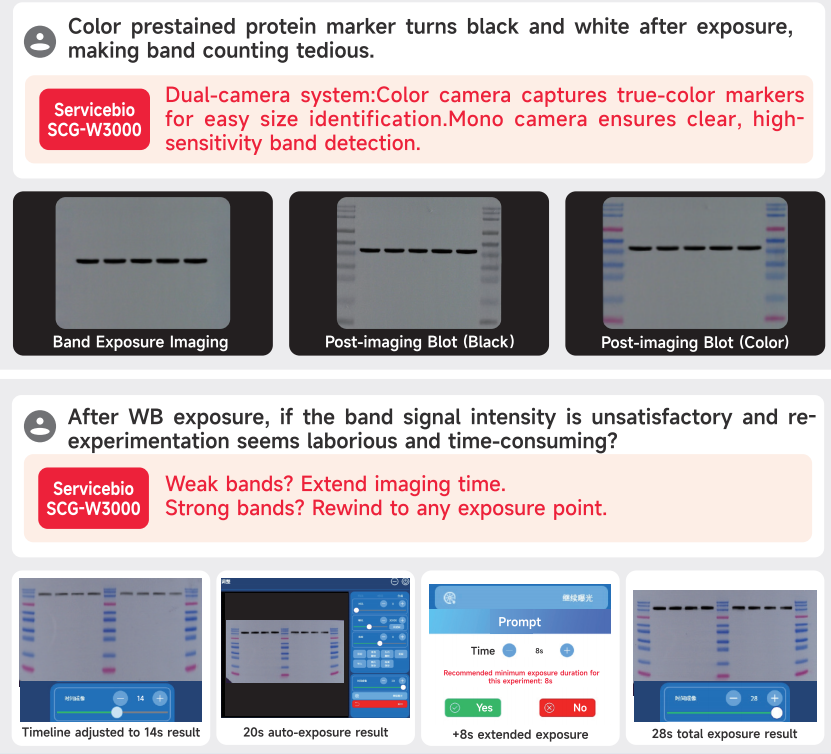
SCG-W3000 Chemiluminescence Imaging System
-
Whether the signal is weak or strong, a single imaging session can deliver your WB results.
-
For weak signals, you can directly extend the imaging time based on the original image for further imaging.
-
For strong signals, you can adjust the timeline to retrieve any result image from the imaging duration.
-
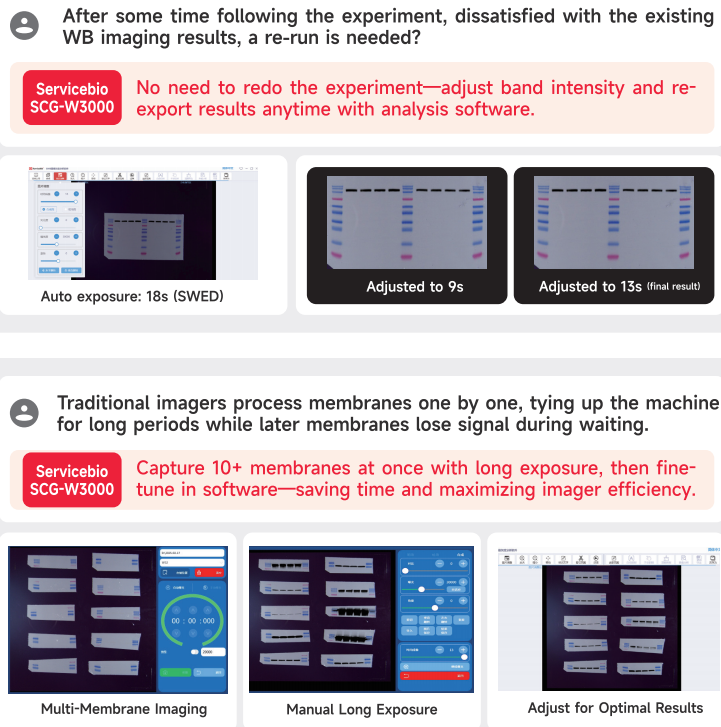
Supports simultaneous imaging of up to 10 membranes (or even more), improving instrument efficiency—1 device equals 10!
-
Dual-camera system:
-
A color camera captures markers with true-to-life colors for greater authenticity.
-
A monochrome camera captures bands with high sensitivity, delivering superior performance for weak signals.
-
Marker optimization function:
-
Eliminates nonspecific band signals caused by prestained markers and antibody interactions.
-
Adjusts overexposed or underexposed chemiluminescent marker signals.
-
Source file storage allows flexible adjustments anytime:
-
If bands appear too thick or too thin after the experiment, you can easily fine-tune the results on your computer using the source file function!
Work with the ECL Chemiluminescence Kit (G2161-200ML), it meets the exposure needs of high, medium, and low-concentration samples. Enjoy a better WB imaging process and achieve superior WB imaging results!
SWE Imaging Grayscale Analysis Software-SCG-W2000 SCG-W3000-3.3.2-win32-x64-setup.exe
Download link from Google Drive:https://drive.google.com/file/d/1IoXazML9PDHoN4HqOYm-t3C2bVFvQ_rt/view?usp=drive_link
SOFTWARE USER MANUAL:
SWE Imaging Grayscale Analysis Software-SCG-W2000 SCG-W3000.pdf


| Product Name | Chemiluminescence Imaging System | |
| Cat. No. | SCG-W3000 | |
| Dimensions | 400mm×371mm×700mm | |
| Camera 1 | Pixel Resolution | 9 million pixels |
| Resolution | 2992*3000 | |
| Pixel Size | 3.76μm×3.76μm | |
| Target Size | 1 “(11.28mm×11.28mm) | |
| Full Well Capacity | 16.5ke-(HCG),50.5ke-(LCG) | |
| Sensitivity | 877mv@1/30s | |
| Readout Noise | 1.24e-(HCG), 3.22e-(LCG) | |
| Dark Current | 0.0003e-/s/pixel@-15℃ | |
| Signal-to-Noise Ratio | 42.2dB(HCG), 47dB(LCG) | |
| Exposure Time | 0.1ms~1h | |
| Binning Mode | 1×1, 2×2, 3×3 | |
| Grayscale | 16-bit (65536 levels) | |
| Cooling | Relative to Ambient Temperature-40℃ | |
| Camera Type | Black and White Camera | |
| Camera 2 | Pixel Resolution | 45 million pixels |
| Resolution | 2992*3000 | |
| Pixel Size | 2.315×2.315μm | |
| Target Size | 1.4“(18.93×13 mm) | |
| Full Well Capacity | 10.8ke- | |
| Sensitivity | 419mv | |
| Readout Noise | 2.12e- | |
| Dark Current | 0.12mV | |
| Signal-to-Noise Ratio | 40.3dB | |
| Exposure Time | 17μs~15s | |
| Binning Mode | 1×1, 2×2, 3×3 | |
| Grayscale | 8bit(256 gray) | |
| Camera Type | Color Camera | |
| Lens1 | Aperture | F0.95-F16 |
| Focal Length | 17mm | |
| Type | Prime lens | |
| Light Source | Bright Field Light Source | Downward-facing LED white light source, symmetrically distributed on both sides |
| Dark Box | Light Isolation | Fully light-sealed, isolates environmental light. |
| Door Control | Door control sensor can control the on/off of the bright field light source. | |
| Field of View | Effective field of view is 136mm*136mm (expandable to 200mm×200mm if needed). | |
| Auto Exposure | Intelligent exposure technology can quickly determine the optima exposure time and automatically perform binning. Combined with time-lapse imaging and time accumulation functions, users can achievethe bestimage results withjust one opematchration. |
|
| Software Functions | Exposure Modes | High Quality:Highest image quality Standard:Balancesimage qualityand exposurespeed High Sensitivity:Fastestexposure speed |
| Real-timelmaging | Real-time presentation of the changes in sample signals during the exposure process, allowing for the observation of every detail ofthe capture. Overexposed areas will be indicated for samples with overexposure. |
|
| Time Imaging | After exposure is complete, each frame image within the exposure time can be generated.Through precise retrospective adjustments users can choose any frame image within that exposure time as the final output. |
|
| Time Accumulation | For samples with insufficient exposure, users can choose to continue exposure after the initial exposureis completed, enabling the sample to receive additionalexposure on topofthe already exposed time. |
|
| Optionalsettings | Color Marker/Black & White Marker, Overexposure Prompt/No OverexposurePrompt |
|
| Industrial Computer | 10.4-inch display with a resolution of 1024×768, running on Windows 10 operating system,featuring16GBofRAM,512GBssD,and built-in Bluetooth and WiFi. |
|
| External Interfaces | 2 USB 3.0 ports | |
| Operating Voltage | 90~132VAC/180~264VAC(selectable via switch),47~63Hz. | |
| Product Power | ≤200W | |
| Product Net Weight | 23.45Kg | |
Notes:
-
Do not touch or scratch the internal lens of the dark box with hands or sharp objects.
-
After placing the sample, ensure the instrument door is properly closed to prevent external light from entering and affecting results.
-
During imaging, avoid shaking the workbench or instrument to prevent compromised image quality.
-
Observe electrical safety—do not pull the power cord or move the instrument during operation.
-
After experiments, clean the dark box thoroughly, removing all samples and residues.
Parameter Comparison
| Cat. No. | SCG-W5000 | SCG-W3000 | SCG-W1000 |
| Dimension | 400×371×700 mm | 400×371×700 mm | 400×371×700 mm |
| Camera | Depth-cooled high sensitivity camera | Depth-cooled high sensitivity camera | High-sensitivity camera |
| Resolution | 2992×3000,9 megapixels | 2992×3000,9 megapixels +2992×3000
45 megapixels |
3072×2048,6.3 megapixels |
| Pixel | 3.76×3.76 μm | 3.76×3.76 μm | 2.4×2.4 μm |
| Shooting Area | Effective field of view for blotting film/protein gel: 136×136 mm Effective field of view for nucleic acid gel: 140×140 mm. |
Blotting Film 136×136 mm |
Nucleic Acid Gel / Protein Gel 140×140 mm |
| Cooling Temperature | Relative ambient temperature -40°C | Relative ambient temperature -40°C | – |
| Light Source | Bright-field Light Source: Downward-facing LED white light source, symmetrically distributed on both sides. UV Light Source: 310 nm LED array for uniform transmission illumination. |
Downward-facing LED white light, symmetrically distributed on both sides | Bright-field Light Source: Downward-facing LED white light source, symmetrically distributed on both sides. UV Light Source: 310 nm LED array for uniform transmission illumination. |
| Industrial Computer | 1match0.4 inches, 1024×768 Windows operating system |
10.4 inches, 1024×768 Windows operating system |
10.4 inches, 1024×768 Windows operating system |
| External Interface | 2 USB3.0 | 2 USB3.0 | 2 USB3.0 |
| Working Voltage | 90~132VAC/180~264VAC (Selectable via switch)47~63HZ |
90-132V/180-264V | 90~132VAC/180~264VAC (Selectable via switch)47~63HZ |
| Product Power | 200 W | ≤200 W | 200 W |
| Net Weight | 25 kg | 23.45 kg | 30 kg |
| Real-Time Imaging | Yes | Yes | – |
| Time Imaging | Yes | Yes | – |
| Time Accumulation | Yes | Yes | – |
| Auto Exposure | Yes | Yes | Yes |
| Choice of 3 Imaging Modes | Yes | Yes | – |
| Protein Gel/Nucleic Acid Gel Imaging | Yes | – | Yes |
| Nucleic Acid Gel Cutting | Yes | – | Yes |
Specifications
Operation Steps
Plug the power cord of the grinder into a grounded 220V power outlet, and turn on the power switch at the back of the grinder.
After the startup interface is displayed, wait for about 5 seconds to enter the main operating interface.
Once the grinder is turned on, the cooling system starts running. Place the grinding tubes containing the samples, tighten the adapter, and cover the top of the grinder.
Set the operating frequency, time, and number of cycles. Click the “Temperature Selection” button to choose the temperature mode and set the desired temperature for the grinding chamber or the cooling platform.
Click the start button to begin the grinding process. The instrument will automatically stop once the timer reaches zero.
Equipment Maintenance
Perform the following routine maintenance after each use to ensure the reliable operation of the grinder.
Make sure to turn off the power and unplug the power cord before cleaning.
If solvents, salt water, acidic or alkaline solutions are spilled on the grinder, immediately wipe them clean with a damp cloth to avoid damaging the instrument.
Do not use high-pressure sterilization on any part of the grinder, including the adapter.
The components of the adapter should be cleaned after use. Use an appropriate cleaning agent, rinse with distilled water, and then wipe dry with a paper towel.
After using an appropriate cleaning agent, wipe the grinder clean with a soft cloth.
The following disinfectants and cleaning agents are recommended for cleaning the grinder and adapter:
a) Ordinary cleaning agent
b) Neutral detergent
c) 70% alcohol content
Equipment List
|
No. |
Product Name |
Model/Specification |
Quantity |
Remarks |
|
1 |
Tissue Homogenizer |
SWE-FP |
1 |
|
|
2 |
Standard Hollow Adapter |
2mL*24 |
1 |
Can process 24 samples at once |
|
3 |
Beads Pen |
SYM-04Z |
1 |
Suitable for 2mL grinding tubes, zirconia beads 4mm |
|
4 |
Beads Pen |
SYM-04B |
1 |
Suitable for 2mL grinding tubes, steel beads 4mm |
|
5 |
Beads Pen |
SYM-03B |
1 |
Suitable for 2mL grinding tubes, steel beads 3mm |
|
6 |
2mL Centrifuge Tube |
1 |
Tube wall is thickened, material strength is higher, and there is no RNA enzyme. |
DNA Extraction
|
Product Name |
Grinding Beads |
Frequency |
Grinding Time |
Pause Time |
Cycle times |
Recommended Extraction Solution |
|
Plant Stems, Leaves |
Stainless Steel Beads 3mm*3, 4mm*1 |
60Hz |
60s |
15s |
3 |
Protein Extraction Solution |
|
Heart, Liver, Spleen, Lungs, Kidneys, Brain of Mice and Rats |
Stainless Steel Beads 3mm*2, 4mm*1 |
60Hz |
30s |
15s |
2 |
Protein Extraction Solution |
|
Stomach, Intestines, Muscles, Fat, Pancreas of Mice and Rats |
Stainless Steel Beads 3mm*2, 4mm*1 |
60Hz |
45s |
15s |
2 |
Protein Extraction Solution |
|
Skin, Ears, Tail, Blood Vessels of Mice and Rats |
Stainless Steel Beads 3mm*3, 4mm*2 |
70Hz |
60s |
20s |
3 |
Protein Extraction Solution |
|
Cartilage, Hair, Hard Bones of Mice and Rats |
Stainless Steel Beads 3mm*4, 4mm*2 |
70Hz |
90s |
20s |
3 |
Protein Extraction Solution |
(This condition is for reference only, and can be adjusted at any time during the experiment according to the grinding effect.)
RNA Extraction
|
Product Name |
Grinding Beads |
Frequency |
Grinding Time |
Pause Time |
Cycle times |
Recommended Extraction Solution |
|
Plant Stems, Leaves |
Zirconia Beads 3mm*3, 4mm*1 |
60Hz |
60s |
15s |
3 |
RNA Extraction Solution |
|
Heart, Liver, Spleen, Lungs, Kidneys, Brain of Mice and Rats |
Zirconia Beads Beads 3mm*2, 4mm*1 |
60Hz |
30s |
15s |
2 |
RNA Extraction Solution |
|
Stomach, Intestines, Muscles, Fat, Pancreas of Mice and Rats |
Zirconia Beads Beads 3mm*3, 4mm*2 |
60Hz |
45s |
15s |
2 |
RNA Extraction Solution |
|
Skin, Ears, Tail, Blood Vessels of Mice and Rats |
Zirconia Beads Beads 3mm*4, 4mm*2 |
70Hz |
60s |
20s |
3 |
RNA Extraction Solution |
|
Cartilage, Hair, Hard Bones of Mice and Rats |
Zirconia Beads Beads 3mm*3, 4mm*4 |
70Hz |
90s |
20s |
3 |
RNA Extraction Solution |
(This condition is for reference only, and can be adjusted at any time during the experiment according to the grinding effect.)
For RNA extraction, the grinding time is extended compared with that of protein extraction, and RNA extraction solution is added to the grinding, the specific grinding time depends on the amount and type of tissue to be ground. Samples difficult to break can be repeated grinding 2-3 times, the specific situation can be adjusted appropriately according to the experiment.
Strong and Tough Tissue Grinding
For samples that are difficult to grind (e.g. cartilage, hair, etc.), we recommend using a 2mL grinding tube. Cut the sample into 1-2mm pieces, add the appropriate number of grinding beads, cover the tube tightly and freeze in liquid nitrogen for 2-3min without extracting solution, dry grind for 60 seconds at 70Hz, then add extracting solution to the tube and repeat the grinding once. If the grinding result is not satisfactory, the tube can be frozen again and the above experimental steps can be repeated.
Bone Tissue Grinding
For bone tissue, use the special steel grinding jar and adapter. The bone tissue is first frozen in liquid nitrogen for 5-10min, then put into the grinding jar, add the steel beads, and grind for 180 seconds at 70Hz (set cycle grinding). After grinding, take out the finished tissue, put it into a 2mL grinding tube, add the extraction solution, two 3mm grinding beads and homogenize for 60 seconds.